Warp3D Nova - Hello Triangle
The previous tutorial set up everything needed to render graphics to a window using Warp3D Nova. Now, it's time to actually draw something. This tutorial will introduce you to shaders and Vertex Buffer Objects (VBOs), and we'll use them to draw a triangle.
A Shader Based Pipeline
At its core, modern Graphics Processing Units (GPUs) are based around shaders. These take in data from arrays/buffers (or another shader), perform calculations, and output the results. Programmable shaders give developers great freedom as to what lighting and geometric models they wish to use.
Two shaders are required: a vertex shader and a fragment shader (a.k.a., a pixel shader). These are connected into a shader-pipeline as shown below:

Here's how the shader pipeline (above) renders our triangle:
- The vertex shader is executed once for each vertex in our triangle. It transforms those vertices to screen coordinates and possibly outputs other attributes too
- Next, a rasterizer reads those positions, and interpolates them to build a list of which pixels/fragments are being rendered to
- Finally, the fragment shader is run once for every pixel (or fragment); it outputs the final colour for each pixel (and possibly a depth value too)
The end result is the rendered image.
Vertex Buffer Objects (VBOs)
3D models are typically built out of triangles (or other polygons) which are, in turn, described by a set of vertices. The GPU takes these vertices, projects them onto the screen (using vertex shaders), and renders the triangles (using the fragment shader).
Warp3D Nova stores vertex data exclusively in VBOs. As the name suggests, a Vertex Buffer Object (VBO) is a block of memory for storing vertex data. The big advantage of using VBOs, is that the block of memory can be in Video RAM (VRAM) on the graphics card itself. This gives the GPU maximum speed access to the vertex data for maximum performance.
If you've used OpenGL, then you're probably familiar with vertex arrays. While vertex arrays are convenient, they're stored in main memory. So, those vertices need to be copied across the PCI(e) bus to the graphics card each and every time that they're used. The PCI(e) bus' bandwidth is more limited than VRAM, and so this can quickly become the performance limiting bottleneck. Fewer triangles means less detailed scenes. As a result, OpenGL also supports VBOs.
With Warp3D Nova I decided to make VBOs the only way to store vertices. This simplifies the driver and forces developers to use the fastest method.
NOTE: VBOs can also be stored in main memory at a location where the GPU can access it. This is useful when the CPU is used to generate vertices on-the-fly.
Step One: Refactoring the Code
Okay, that's enough theory; let's get to work! Our starting point is the code from the previous tutorial. So, create a copy of the previous tutorial's code, and rename it.
Now let's do a bit of refactoring. Source code is easier to read and understand if it's divided into logical blocks and organised into separate files. For example, the code that creates and manages render contexts is a logical block. I transferred that to a new file called Context.c. Likewise, the code to open/close libraries was also moved.
Refactoring code doesn't relate directly to Warp3D Nova, so I'm going to skip over it. Try to do the refactoring yourself, and/or have a look at the final tutorial code, which can be downloaded at the end of this tutorial.
Before moving on, lets create an error-check macro that we'll be using a lot:
/** Macro for main that shows an error requester if errCode != W3DNEC_SUCCESS,
 * and exits the program
 */
#define FAIL_ON_ERROR(errCode, funcName) \
	if(errCode != W3DNEC_SUCCESS) {												\
		showErrorRequester("context->%s() failed (%lu): %s\n", 					\
			funcName, errCode, IW3DNova->W3DN_GetErrorString(errCode));	\
		retCode = 10;															\
		goto CLEANUP;															\
	}
Step Two: The Shaders
As mentioned earlier, there are two shaders to write.
The Vertex Shader
Create a text file called "Simple2D.vert". If you're using CodeBench, double-click on "other files" in the project window, and create the new file. Here's the shader code for Simple2D.vert:
/** Simple 2D per-vertex colour shader.
 */
#version 140

in vec2 vertPos;

out vec4 colour;

const vec4 white = vec4(1.0);

void main() {
    colour = white;
    gl_Position = vec4(vertPos, 0.0, 1.0);
}
Let's go through this one section at a time. The "#version 140" statement at the top specifies that this shader is written using version 1.4.0 of the GLSL specification.
The next two lines declare input and output variables:
in vec2 vertPos;

out vec4 colour;
So, the vertex shader takes a 2D vertex position as input, and outputs a 4 channel colour parameter. The colour output isn't really needed right now; I've included it for two reasons:
- It demonstrates passing parameters from the vertex shader through to the fragment shader
- Early W3DN_SI drivers contain a bug that causes the GPU to hang if no parameter is output (fixed in version 1.20)
The next line creates a constant for the colour white:
const vec4 white = vec4(1.0);
Colours have 4 channels, Red, Green, Blue, & Alpha (RGBA). The alpha channel stores how opaque a pixel is (0.0 being transparent, and 1.0 being 100% opaque). Vec4(1.0) is shorthand for a 4D vector where all values are 1.0, which is solid white.
The main() function is called for every vertex. The code simply sets the output colour to white, and copies the 2D position into gl_Position (which is a predefined output).
void main() {
    colour = white;
    gl_Position = vec4(vertPos, 0.0, 1.0);
}
Vec4(vertPos, 0.0, 1.0) is the equivalent of vec4(vertPos.x, vertPos.y, 0.0, 1.0). This is needed because our input vector is 2D, whereas gl_Position is a 4D vector.
The Fragment Shader (Simple2D.frag)
The fragment shader code is as follows:
/** Simple 2D per-fragment colour shader.
 */
#version 140

in vec4 colour;

void main() {
    gl_FragColor = colour;
}
This simply takes the interpolated colour received from the vertex shader (via the rasterizer), and writes it to the output pixel (gl_FragColor).
Step Three: Compiling the Shaders
Warp3D Nova need the shaders to be in SPIR-V format. It comes with a GLSL compiler called GLSLangValidator. Shaders can be compiled to SPIR-V format using the following command line:
glslangValidator -G -o <outfilename> <infilename>
Compiling GLSL Shaders in CodeBench
CodeBench can be set up to compile GLSL shaders by creating a few custom rules.
First, we need two rules to compile *.vert and *.frag files to *.vert.spv and *.frag.spv, respectively. From the menu-bar, select Project => Settings. Open the "Make" tab, and click on "Configure rules." Click "New" to create a new rule. Create the rule as follows:
- Set "Rule target" to: %.vert.spv
- Create a new depencency (click "New" in the dependencies box): %.vert
- Create a new command: @glslangValidator -G -o $@ $<
NOTE: This looks cryptic, but it executes "glslandGalidator -G -o <name>.vert.spv <name>.vert - Make sure that "Execute this rule" is set to "Manually only"
The end result should look as follows:

Now, create an identical rule for fragment shaders. The details are:
- Rule target: %.frag.spv
- Dependency: %.frag
- Command: @glslangValidator -G -o $@ $<
- Execute this rule: Manually only
These two rules will compile *.vert and *.frag shaders. Now, CodeBench needs the names of the shaders to compile. So, create a new rule for Simple2D.vert with the following details:
- Rule target: Simple2D.vert.spv (i.e., the name of the compiled file)
- Execute this rule: Before building the target (ensures that it gets built automatically, before the main binary)
Finally, create one more:
- Rule target: Simple2D.frag.spv (i.e., the name of the compiled file)
- Execute this rule: Before building the target (ensures that it gets built automatically, before the main binary)
This rule should look as follows:

This set of rules will compile the shaders before the main program is compiled. It's easy to add more shaders; simply create a new "Before building the target" rule for each file.
Step Four: Loading the Shaders
Okay, we have our shaders in the right format. Now it's time to load them in our "Hello Triangle" program. Here's the function that performs this task:
/** Compiles a shader.
 * This will print a compilation/error log if needed.
 *
 * @param context pointer to the Warp3D Nova context
 * @param filename the shader's filename
 * @param logLevel the compilation log level. When set to W3DNLL_ERROR, then
 * logging information will only be printed if an error occurred. Otherwise, log
 * info will always be printed
 *
 * @return W3DN_Shader* pointer to the shader, or NULL if failed
 */
W3DN_Shader* compileShader(W3DN_Context *context,
		const char *filename, W3DN_LogLevel logLevel) {
	W3DN_ErrorCode errCode;
	const char *shaderLog = NULL;
	W3DN_Shader *shader = context->CompileShaderTags(&errCode,
		W3DNTag_FileName, filename, W3DNTag_Log, &shaderLog,
		W3DNTag_LogLevel, logLevel, TAG_DONE);
	if(!shader) {
		printf("Compiling %s failed (%u) with error: %s\n", filename,
			errCode, IW3DNova->W3DN_GetErrorString(errCode));
		if(shaderLog) {
			printf("Log:\n%s\n", shaderLog);
			context->DestroyShaderLog(shaderLog);
		}
		return NULL;
	}

	if(shaderLog) {
		if(logLevel != W3DNLL_ERROR) {
			printf("%s compilation log:\n%s\n", filename, shaderLog);
		}
		context->DestroyShaderLog(shaderLog);
		shaderLog = NULL;
	}

	return shader;
}
The following line loads the shader, and compiles it to the GPU's machine code:
W3DN_Shader *shader = context->CompileShaderTags(&errCode,
	W3DNTag_FileName, filename, W3DNTag_Log, &shaderLog,
	W3DNTag_LogLevel, logLevel, TAG_DONE);
The W3DNTag_Log and W3DN_LogLevel tags allow you to extract errors and other debugging information. The downloadable tutorial code sets the logging level to W3DNLL_DEBUG if "-v" is passed as parameter. This prints the maximum amount of information, including a disassembly of the generated machine code. This is very useful when debugging shader problems.
Setting Up the Shader Pipeline
At the top of main(), add three new variables to store the shaders and pipeline:
W3DN_Shader *vertShader = NULL;
W3DN_Shader *fragShader = NULL;
W3DN_ShaderPipeline *shaderPipeline = NULL;
The shaders are loaded as follows (inserted just below the code that creates) the render context:
// Will be using the Warp3D Nova context a lot...
W3DN_Context *context = renderContext->context;


// -- Set up the shaders --
// Compile the shaders
vertShader = compileShader(context, "Simple2D.vert.spv", logLevel);
fragShader = compileShader(context, "Simple2D.frag.spv", logLevel);
if(!vertShader || !fragShader) {
	showErrorRequester("Couldn't compile shaders.");
	goto CLEANUP;
}
The code above loads the two shaders, and makes sure that they compiled okay. Next, we connect them up into a shader pipeline:
// Create the shader pipeline
errCode = W3DNEC_SUCCESS;
shaderPipeline = context->CreateShaderPipelineTags(&errCode,
	W3DNTag_Shader, vertShader, W3DNTag_Shader, fragShader, TAG_DONE);
FAIL_ON_ERROR(errCode, "CreateShaderPipelineTags");
Activate the Shader Pipeline
Warp3D Nova won't use a shader pipeline until you tell it to (you're in complete control). So, lets activate the new pipeline:
// Set the shader pipeline as current
errCode = context->SetShaderPipeline(NULL, shaderPipeline);
FAIL_ON_ERROR(errCode, "CreateShaderPipelineTags");
The pipeline is now ready for action!
Step 5: Create the Triangle
The shaders may be ready, but we don't have anything for them to render yet. For that, we need to create a VBO and store the triangle's vertices in it. First, let's define what that vertex looks like:
/** Encapsulates the data for a single vertex
 */
typedef struct Vertex_s {
	float position[2];
} Vertex;

/** The index for the position data in the VBO
 * (must match the Vertex structure above).
 */
const uint32 posArrayIdx = 0;
The Vertex structure above matches the vertex shader's input (in vec2 vertPos) exactly. PosArrayIdx indicates that the position vertex attribute will be stored in array 0. It's critical that all parts of the code (including shaders) use the same data format and layout. Otherwise, it just won't work.
Now, let's create the VBO itself. At the top of the main() function, add a new variable:
W3DN_VertexBuffer *vbo = NULL;
Next, insert the following code below the shader pipeline code code from the previous section:
// -- Create the Geometry to be Rendered --
// Create the Vertex Buffer Object (VBO) containing the triangle
uint32 numVerts = 3;
uint32 numArrays = 1; // Only using a position array
vbo = context->CreateVertexBufferObjectTags(&errCode,
		numVerts * sizeof(Vertex), W3DN_STATIC_DRAW, numArrays, TAG_DONE);
FAIL_ON_ERROR(errCode, "CreateVertexBufferObjectTags");
This creates a new VBO. The W3DN_STATIC_DRAW usage hint that says "we'll write to the VBO once, and draw/render with it many times." This lets the driver know that the VBO is best stored in VRAM.
Now the driver needs to know what will be stored in the VBO. The following code says that array 0 (posArrayIdx) is an array of 2D floating-point vectors, with a stride the size of Vertex (stride being the number of bytes from one vertex to the next):
// Set the VBO's layout
uint32 stride = sizeof(Vertex);
uint32 posNumElements = 2;
errCode = context->VBOSetArray(vbo, posArrayIdx, W3DNEF_FLOAT, FALSE, posNumElements,
	stride, 0, numVerts);
FAIL_ON_ERROR(errCode, "VBOSetArray");
Why do this before writing the data? Because AmigaOS is (currently) a big-endian Operating System running in an increasingly little-endian world. The latest GPUs (e.g., AMD Radeon HD 7000+) are little-endian, and so the driver needs to convert all data between big-endian and little-endian formats. This needs to be done before we write any data to the buffer.
Now it is time to write the triangle to the VBO:
// Lock the VBO for access
// NOTE: We're replacing all data in the VBO, so the read range is 0
W3DN_BufferLock *vboLock = context->VBOLock(&errCode, vbo, 0, 0);
FAIL_ON_ERROR(errCode, "VBOLock");

// Vertex 0
Vertex *vertices = (Vertex*)vboLock->buffer;
vertices[0].position[0] = 100.0f;
vertices[0].position[1] = 50.0f;

// Vertex 1
vertices[1].position[0] = 320.0f;
vertices[1].position[1] = 420.0f;

// Vertex 2
vertices[2].position[0] = 540.0f;
vertices[2].position[1] = 50.0f;

// Unlock the VBO
// NOTE: We've updated the entire VBO, so the parameters reflect that
errCode = context->BufferUnlock(vboLock, 0, vboLock->size);
FAIL_ON_ERROR(errCode, "BufferUnlock");
NOTE: You may notice that VBOLock() and BufferUnlock() take address ranges as parameters. These tell the driver which parts you wish to read and write, respectively. This allows you to efficiently update parts of the buffer. Here, we write to the entire buffer, so the read range is 0 and the write range is the entire buffer.
Bind the VBO
Remember how the vertex shader (Simple2D.vert) had one input called vertPos? This is called a vertex attribute, and we want the GPU to fetch vertPos from our new vbo:
// Bind the VBO to the default Render State Object (RSO)
uint32 posAttribIdx = 0; // Have only one vertex attribute, so it's index is 0
errCode = context->BindVertexAttribArray(NULL,
	posArrayIdx, vbo, posAttribIdx);
FAIL_ON_ERROR(errCode, "BindVertexAttribArray");
This assigns the VBO's vertex array number 0 (posArrayIdx) to vertex attribute 0 (posAttribIdx). Vertex attributes are addressed by index. Since Simple2D.vert has only one input (vertPos), its index is 0.
Step 6: Draw the Triangle!
Yes, we can finally draw the triangle. This is done using DrawArrays():
// Render the triangle
context->DrawArrays(NULL, W3DN_PRIM_TRIANGLES, 0, numVerts);
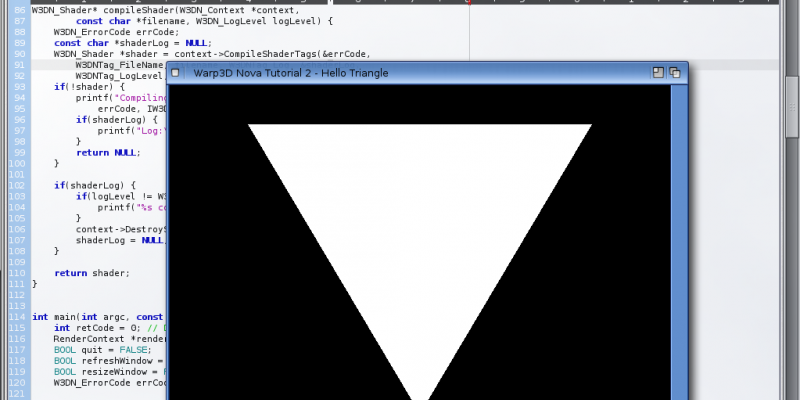
And with that one line, we have our triangle!

Step 7: Cleanup
Warp3D Nova will cleanup all allocated objects when a context is closed. However, it's good practise to cleanup objects yourself. So, the VBO, shaders, and shader pipeline all need to be destroyed before exit:
	// -- Cleanup --
CLEANUP:
	if(vbo) {
		context->DestroyVertexBufferObject(vbo);
		vbo = NULL;
	}
	if(shaderPipeline) {
		context->DestroyShaderPipeline(shaderPipeline);
		shaderPipeline = NULL;
	}
	if(fragShader) {
		context->DestroyShader(fragShader);
		fragShader = NULL;
	}
	if(vertShader) {
		context->DestroyShader(vertShader);
		vertShader = NULL;
	}
	if(renderContext) {
		rcDestroy(renderContext);
		renderContext = NULL;
	}
Conclusion
You should now understand the basics of how to use shaders and VBOs to render graphics. Sure, right now it's just one white triangle. However, computers are very good at repetitive tasks. So if you can render one triangle, then you can render a thousand too. In the next tutorial we'll add a splash of colour.
Download the complete tutorial code: W3DNovaTutorial2.lha
Got any questions or comments, feel free to leave them below.


Post your comment